|
||||||||||||||||||||||||||
  
|
Batch File CreationBatch files are simply text files containing a series of commands that will be sent one at a time to the command line, and are fairly easy to create. Since Titan CLI is a command line program, batch files are a great way to automate multiple runs of Titan CLI. Batch files can be very powerful and useful when used with Titan CLI. We will use a simple one in this example. Our goal will be to create a batch file that will direct Titan CLI to run five different XML job files in succession, without any input from the user. To start, open Notepad or another basic text editor. The syntax to run Titan CLI from the command line is as follows: [Path to Titan CLI EXE] [Full or relative path to XML job file] [1, 2] The last setting, [1, 2], is a switch that controls how Titan CLI displays its progress dialog. If the switch is omitted, the progress dialog appears, and stays on the screen once the run completes; this is the default setting. If a 1 is placed after the command, Titan CLI will hide the progress dialog entirely. If a 2 passed to Titan CLI, it will display the progress dialog, and close the window once the run completes. This is the setting that we will use in the batch file, as this will allow multiple job files to be run one after the other without user intervention while still showing progress information. In this example, Titan CLI resides in its default install directory (C:\Program Files\MicroForensics\Titan CLI\Modules\TitanCli.exe), the XML job files are located in the root level of the D drive (D:\First_Job.xml). Our command for the batch file will therefore look like this: C:\Program Files\MicroForensics\Titan CLI\Modules\TitanCli.exe D:\First_Job.xml 2 The quotation marks around the paths are necessary if there is a space in the path, such as with Program Files. This command will launch Titan CLI, direct it to run using the settings stored in the First_Job.xml job file, and then close when finished. Since we want to perform multiple runs with Titan, we need to enter the remaining job files on new lines, making the batch file look something like this: 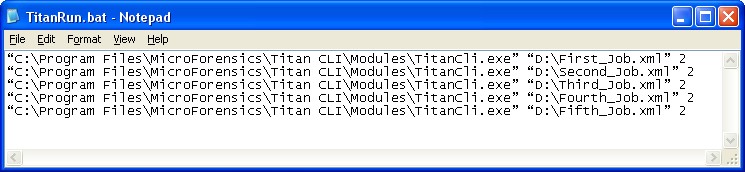 Once the commands have been entered, all the user has to do is save it as a batch file. In Notepad, go to File -> Save As, change the Save as type to All Files, and save the file as TitanRun.bat. Now that the batch file has been created, it can be run immediately by simply double-clicking it, or even run at a later time using Windows Task Scheduler. |
|||||||||||||||||||||||||